

How to Use the Thumbnail Pane in PowerPoint
Many PowerPoint users find themselves overwhelmed by cluttered slides or struggling to navigate their presentation decks efficiently. You’re not alone—getting the hang of managing slides smoothly can be tricky at first.
To use the Thumbnail Pane in PowerPoint, you first show it in Normal view or press ⌘+1 on Mac. You can resize the pane by dragging its right edge or collapse it to free up space.
Drag thumbnails to reorder slides or organize them into sections. In the desktop version, you can resize or hide the pane for a better workflow, though the online version keeps it fixed.
Keep exploring to reveal more tips.
Key Takeaways
- Access the thumbnail pane through Normal view or press ⌘+1 on Mac for quick slide previews.
- Resize the pane by dragging its right edge. This makes it easier to see your slides or to free up workspace.
- Drag slide thumbnails to reorder or restructure your presentation quickly and easily.
- You can collapse or hide the pane if you want more space for editing your slides.
- Use the section triangles to organize your slides. Drag slides between sections to manage the flow smoothly.
What Is the PowerPoint Thumbnail Pane and Why Does It Matter?
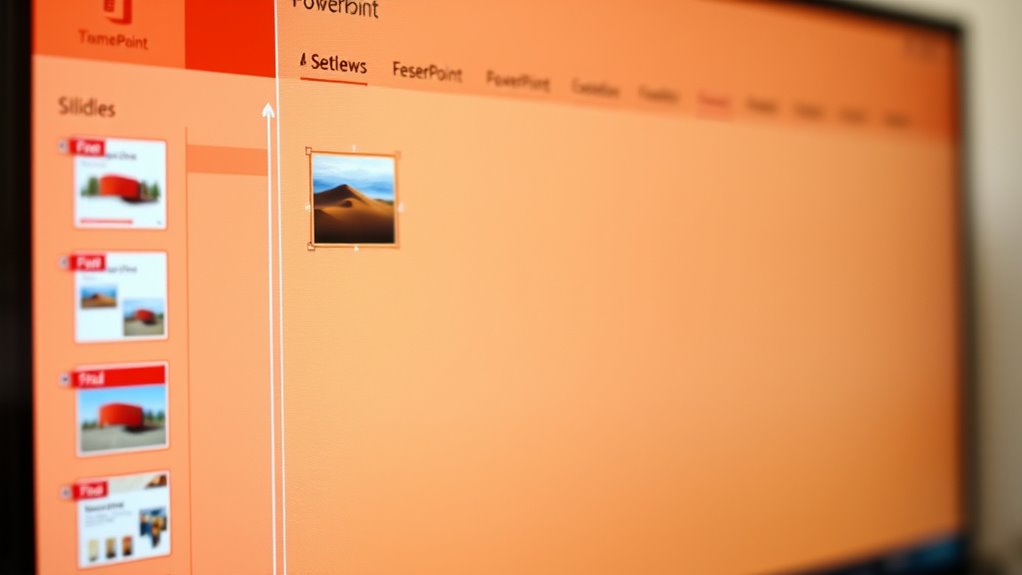
Ever wondered how to navigate your PowerPoint slides more easily? The thumbnail pane is your go-to tool. It shows small previews of all your slides on the left side of your workspace, giving you a quick overview of your entire presentation.
This feature helps you organize and move through your slides effortlessly. You can drag slides within the pane to reorder or restructure your flow with ease. It’s especially useful for complex or collaborative decks.
You can also resize, collapse, or hide the thumbnail pane to make your workspace fit your needs. Using this feature makes managing your presentation simpler, saving you time and avoiding frustration.
How to Show, Hide, and Resize the Thumbnail Pane in PowerPoint
To manage the visibility and size of the thumbnail pane in PowerPoint, you can easily show, hide, or resize it based on your workspace needs.
- To show the thumbnail pane, select Normal view from the View tab or press ⌘+1 on Mac. Then, drag the right edge of the pane to resize it.
- To hide the pane, drag its right edge all the way to the left or click the collapse arrow. This maximizes your Slide pane.
- To resize, hover over the right edge until the splitter arrow appears. Then, drag left or right to adjust the thumbnail pane’s size.
Note that in PowerPoint Online, the pane is fixed and cannot be resized or hidden.
Customizing Thumbnails for Better Slide Organization
Customizing thumbnails in PowerPoint helps you organize your slides more easily, making navigation smoother. You can resize the thumbnail pane by dragging its right edge, which adjusts the slide previews for better visibility or more workspace.
Collapsing the pane gives quick access to slides while keeping your workspace tidy, perfect for detailed editing. Hiding it completely maximizes space, especially when you’re focusing only on slide content.
On desktop versions, you can customize the size of the thumbnail pane, but in PowerPoint Online, it stays fixed. Adjusting the size provides a clear overview of your slide sequence, making it easier to reorder slides and improve your workflow.
Organizing and Rearranging Slides Using Thumbnails Effectively
Using thumbnails in PowerPoint makes it easy to organize and rearrange your slides efficiently. You can quickly reorder slides by dragging and dropping thumbnails within the pane, creating a logical flow.
To manage sections, use the collapse and expand triangles to group related slides visually. This keeps your workspace tidy and gives you a clear overview of your presentation.
Seeing a visual overview helps you identify and adjust slides easily. Dragging slides between sections keeps your presentation’s structure cohesive and flowing smoothly.
Whether you’re rearranging individual slides or managing entire sections, thumbnails make the process simple. They save you time and effort, keeping your presentation organized and easy to modify during editing.
Differences Between PowerPoint Desktop and Online Thumbnails
Have you noticed that the thumbnail pane behaves differently in PowerPoint’s desktop and online versions? In PowerPoint desktop, the thumbnail pane is resizable, hideable, and collapsible, giving you more control over workspace customization.
You can manually resize the thumbnail pane by dragging the splitter or hide it when you need more space for your slides. In contrast, PowerPoint Online displays the thumbnail pane at a fixed size that cannot be resized or hidden, providing a consistent interface across devices.
The thumbnail pane is always visible in Online, which limits customization options but allows quick access. These differences reflect the desktop version’s focus on flexibility for complex workflows versus Online’s emphasis on simplicity and accessibility.
Troubleshooting Common Thumbnail Problems in PowerPoint
Thumbnail display issues in PowerPoint can be frustrating, especially when previews don’t update automatically after you make changes to your slides.
First, check if the “Save preview picture” option is enabled in the file properties. This makes sure PowerPoint can generate a new thumbnail.
Ensure the “Save preview picture” option is enabled in file properties for accurate thumbnail previews.
Next, refresh the view by pressing F5 in File Explorer to force an update.
If thumbnails still aren’t showing correctly, try deleting the thumbnail JPEG inside the PowerPoint ZIP archive. This forces PowerPoint to create a new preview picture.
Common display problems often come from outdated PowerPoint versions or corrupted cache files.
To fix this, update your software or clear the cache.
Following these steps will help ensure your thumbnails are accurate and up-to-date during your presentation editing.
Frequently Asked Questions
How to Use the Thumbnails Pane in Powerpoint?
To use the Thumbnails Pane in PowerPoint, start by opening your presentation in Normal view. You can show or hide the pane through the View tab or by pressing ⌘+1 on a Mac.
Once the pane is visible, you can resize it by dragging its edge. You can also reorder slides by dragging the thumbnails around or organize slides into sections.
This makes browsing and managing your presentation much easier and more efficient.
How Do I Add a Thumbnail in Powerpoint?
Imagine your slides are enthusiastic party guests, waiting for a name tag. To add a thumbnail, right-click between slides in the thumbnail pane and select “Add Section.”
A new group appears, ready for your label. Type the name, hit “Rename,” and your slide is now part of a tidy, organized party.
This helps keep your presentation neat and makes it easy to find slides faster than gossip at a cocktail party.
How Do I Change the Thumbnail View in Powerpoint?
To change the thumbnail view in PowerPoint, you can resize the thumbnail pane by dragging its right edge in Normal view. This makes it larger or smaller to fit your needs.
If you want more space for editing, you can hide or collapse the pane by dragging it all the way to the left. In PowerPoint Desktop, resizing is available, but in PowerPoint Online, the pane size is fixed.
You can also switch to Slide Sorter view for a different thumbnail arrangement.
What Is a Thumbnail in Powerpoint?
Think of a thumbnail in PowerPoint as a tiny treasure map guiding you through your presentation. It’s a small preview image of each slide, showing you what’s inside at a glance.
You can see your slides quickly, rearrange them, or jump to a specific one without scrolling through endless slides.
Thumbnails make managing your presentation easier, helping you stay organized and focused on creating a polished final product.
Conclusion
Mastering the thumbnail pane can boost your PowerPoint efficiency by up to 30%, according to recent studies. By customizing, organizing, and troubleshooting thumbnails, you can streamline your workflow and create more polished presentations.
Whether you’re using the desktop or online versions, understanding how to optimize this feature makes slide management effortless. So, take control of your slides today.
Using the thumbnail pane effectively will improve your presentation skills and make your slides look more professional and clear.