How You Can Cook Ham in a Roaster Pan Step-by-Step
Many people struggle with cooking the perfect ham—getting it juicy, flavorful, and cooked just right can feel tricky. If you’re tired of dry or unevenly cooked ham, you’re not alone. Luckily, using a roaster pan can make the process easier and more foolproof.
To cook ham in a roaster pan, start by selecting a fully cooked, moist ham and let it rest at room temperature. Preheat your roaster to 275°F, add water or pineapple juice to the bottom, and position a wire rack inside.
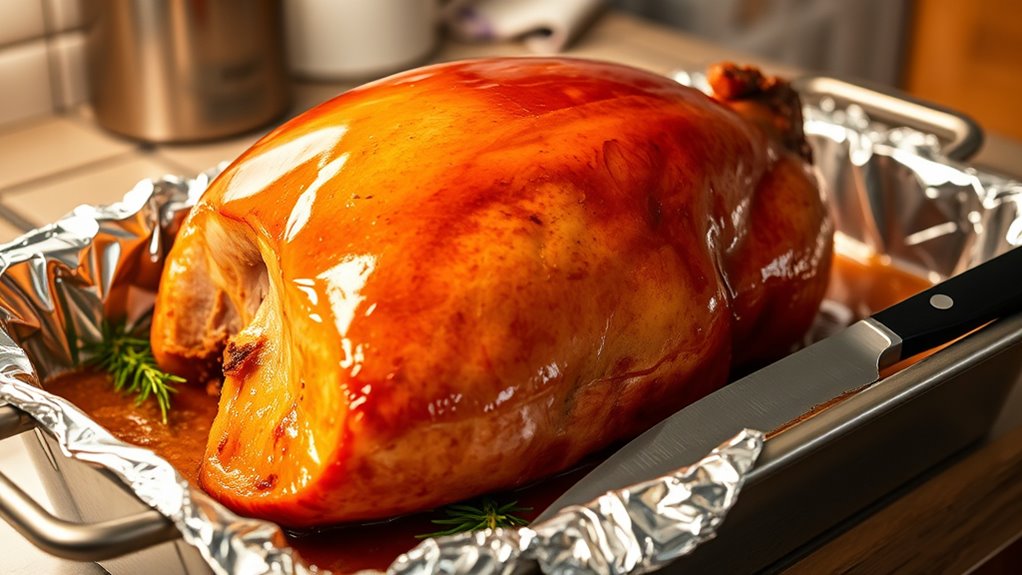
Wrap the ham in foil, place it on the rack, and cook until it reaches 120°F internally. Baste with glaze as it cooks, then increase heat at the end to caramelize. Keep going for all the tips you need to perfect your ham!
Key Takeaways
- Preheat your roaster to 275°F. Add 2-4 cups of liquid, like pineapple juice or water, into the pan. Place a wire rack inside the roaster.
- Rest the ham at room temperature. Wrap it in foil and set it on the rack. Make sure the bottom has enough liquid to keep the ham moist.
- Cook the ham until it reaches 120°F. Baste it with glaze every 30-45 minutes. During the final stages, pour two-thirds of the glaze over the ham.
- Near the end, increase the temperature to 425°F for caramelization. Brush with the remaining glaze to get that crispy, flavorful crust.
- Once cooked, let the ham rest for about 10 minutes. Then, slice and serve. You can also garnish it if you like.
- If needed, reheat the ham until it reaches 140°F before serving.
How to Cook Ham in a Roaster Oven: A Step-by-Step Guide
Cooking ham in a roaster oven is simple and gives you a juicy, flavorful meal. Start by preheating your electric roaster oven to 275°F. Then, add 2-4 cups of water to the bottom to keep everything moist.
Cooking ham in a roaster oven ensures a juicy, flavorful, and easy meal.
Wrap your fully cooked ham tightly in heavy-duty foil. Make sure it’s secure but loose enough to open later. Place the foil-wrapped ham on a rack inside the roaster.
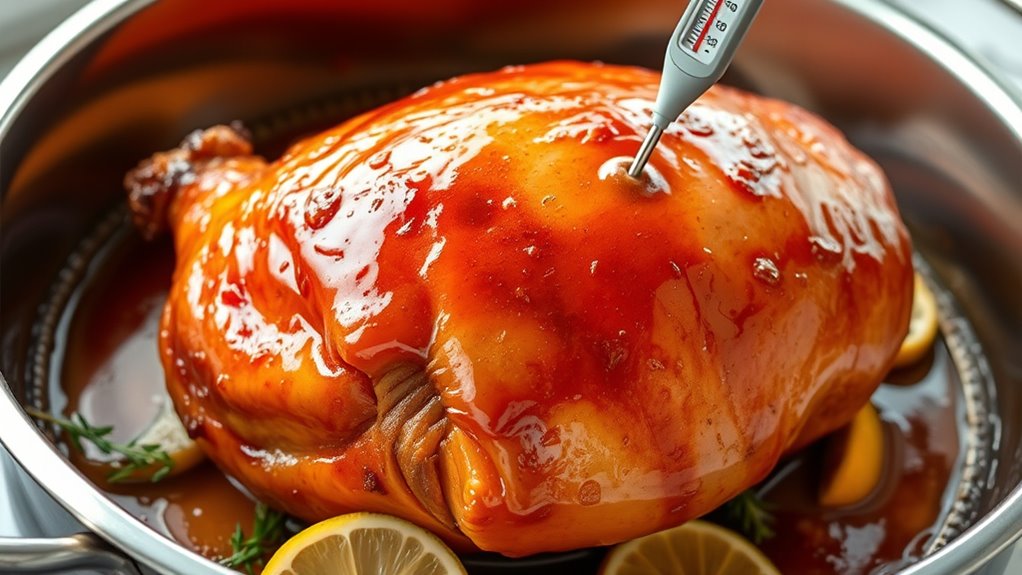
Insert a meat thermometer into the thickest part of the ham, avoiding the bone. Cook until the internal temperature hits 140°F. This usually takes about 15-20 minutes per pound.
Baste the ham with glaze or juices every 30-45 minutes to keep it flavorful. Near the end, uncover the ham, turn the temperature up to 425°F, and bake for 15-20 minutes.
Check to see if the glaze is bubbly and caramelized. Once it looks perfect, your ham is ready to serve!
Choosing the Best Ham for Your Roaster Oven Recipe
When choosing a ham for your roaster oven, look for a fully cooked, bone-in spiral ham labeled as “city ham” for easy reheating.
Aim for a size around 10-12 pounds to make sure it fits well and cooks evenly. Think about whether you prefer bone-in or boneless, based on your taste.
Also, check if the ham comes with a glaze packet or is suitable for glazing, as this can really boost the flavor during cooking.
Ham Types and Labels
Choosing the right ham for your roaster oven starts with understanding the labels. Look for a spiral ham that’s fully cooked and labeled as “city ham” or “ready to serve,” which only needs reheating.
A bone-in ham adds flavor and moisture, making it ideal for roasting. If you want a glazed ham, check for a glaze packet or clear heating instructions—some hams come pre-glazed or are glazed-injected, saving prep time.
Many hams are pre-glazed, so you don’t need to add extra sauce. For best results, select a ham weighing around 8-10 pounds, fitting most electric roasters comfortably.
Prioritize hams with higher moisture content, such as those in heavy syrup, to guarantee juicy, flavorful slices when served.
Size and Serving Count
Selecting the right size ham guarantees it fits your roaster and provides enough for everyone. For standard roasters, go for a fully cooked, bone-in or boneless spiral ham weighing between 8 to 12 pounds.
If you’re using a larger 22-quart roaster, you can cook a ham up to 26 pounds, but smaller hams tend to heat more evenly.
Plan on serving about 1/3 to 1/2 pound of ham per person, depending on appetites and side dishes.
The size of ham you choose affects both the number of servings and leftovers.
If you’re hosting a bigger gathering, consider cooking multiple smaller hams or portions for easier management.
Don’t forget to pick a ham with a glaze packet if you want extra flavor, especially when serving hearty sides.
Bone-In vs. Boneless
Bone-in hams often give you a richer flavor and stay juicy because the bone helps conduct heat during cooking. They usually take longer—about 15-20 minutes per pound—and benefit from wrapping in foil to keep the moisture in.
Boneless hams cook faster, usually needing less time, and are easier to carve. They’re great for casual meals and make serving and slicing more convenient.
When choosing, think about whether you want more flavor or more convenience. Always use a meat thermometer to make sure the internal temperature hits 140°F.
Here’s a quick comparison:
| Feature | Bone-In | Boneless |
|---|---|---|
| Cooking Time | Longer (15-20 min/lb) | Shorter |
| Juiciness | Higher | Slightly less |
| Ease of Carving | More difficult | Easier |
| Flavor | Richer | Mild |
| Foil Wrap | Recommended | Optional |
Preparing Your Ham for Juicy, Flavorful Results
Before cooking, rest your ham uncovered for 30-40 minutes to help it heat evenly and stay juicy.
Wrap it tightly in foil to lock in moisture, and make sure the pineapple juice covers the bottom of the roaster by at least a quarter-inch to keep it flavorful and tender.
These steps will help ensure your ham stays moist and delicious throughout the cooking process.
Rest Ham Before Cooking
To guarantee your ham turns out juicy and flavorful, it’s important to let it rest at room temperature for 30 to 40 minutes before cooking. This resting period helps the meat fibers relax, which leads to juicier slices and better flavor.
It also promotes even heat distribution during cooking, ensuring your ham cooks uniformly. During this time, avoid covering the ham tightly, as trapped moisture can affect the texture.
Here’s what you should do:
- Take the ham out of the refrigerator.
- Let it sit uncovered at room temperature.
- Rest for 30-40 minutes to relax the meat fibers.
- Prepare to cook, knowing the ham is ready for even heat and moisture retention.
This simple step really boosts tenderness and flavor, making your cooked ham irresistible.
Wrap Tightly in Foil
Once your ham has rested and is ready for cooking, wrapping it tightly in heavy-duty aluminum foil helps keep it moist and flavorful. Use enough foil to fully enclose the ham, overlapping the edges to create a secure seal that traps the juices inside.
Tightly wrapping the ham helps it retain its natural moisture, making the final product juicier and more tender. Make sure the foil is snug but not so tight that it tears or damages the surface.
Covering the ham securely with foil allows heat to circulate evenly, promoting consistent cooking and helping the glaze stick better. This simple step makes a big difference in how delicious your ham turns out.
Cover With Pineapple Juice
Have you checked that there’s enough pineapple juice to coat the bottom of your roaster? Covering your ham with pineapple juice is key to keeping it moist and flavorful. Here’s what to do:
- Make sure the bottom of the roaster has at least 1/4 inch of pineapple juice. This helps keep the ham moist and lets the flavors soak in.
- Before cooking, completely cover the ham with pineapple juice. This keeps it juicy and adds a nice sweetness.
- During prep, add more pineapple juice if needed. It helps tenderize the ham and gives off a fruity aroma.
- Keep the pineapple juice coverage steady during cooking. This prevents the ham from drying out and ensures even heating.
Following these steps will help you get a tender, flavorful, and juicy ham every time.
Setting Up Your Roaster Oven for Perfect Cooking
Before placing your ham in the roaster, make sure it’s set up correctly for ideal results. Start by preheating your roaster oven to around 275°F. Add 2-4 cups of water or pineapple juice to the bottom to keep the ham moist.
Place a wire rack inside to elevate the meat above the liquid, ensuring even heat circulation. Wrap the ham tightly in heavy-duty foil to seal in moisture and promote uniform heating.
When you’re ready, cover the roaster tightly with its lid, but leave a slight gap if you plan to open it for glazing or basting. Proper setup guarantees a juicy, evenly cooked ham every time.
How to Roast a Ham in a Roaster Oven From Start to Finish
With your roaster oven preheated and the ham wrapped in foil on a rack over liquid, you’re ready to start roasting.
Place the ham in the oven at 275°F and cook until the internal temperature reaches 120°F. For a 10-pound ham, this usually takes about 1 to 1.5 hours.
Remove the ham and pour two-thirds of your prepared glaze over it after about three-quarters of the total cooking time.
Continue roasting until the internal temperature hits 140°F. Then, raise the oven temperature to 425°F to caramelize the glaze for 15-20 minutes.
Let the ham rest uncovered for 30 to 40 minutes before slicing. Use a meat thermometer to make sure it’s fully cooked, juicy, and flavorful.
Making and Applying a Delicious Ham Glaze
Creating a flavorful ham glaze starts with combining ingredients like brown sugar, pineapple juice, and mustard. Then, boil the mixture for about 2 minutes to meld the flavors.
Once ready, set aside one-third of the glaze for later. During the final stages of cooking, pour two-thirds of the warm glaze over the ham. Re-wrap it to let the glaze soak in.
When the ham reaches an internal temperature of 120°F, brush on the remaining glaze with a pastry brush. This gives it a glossy, flavorful coating.
The glaze adds a beautiful shine and boosts the ham’s sweetness. For a caramelized crust, increase the oven or roaster temperature to 425°F. Roast for an extra 15-20 minutes, but watch closely to avoid burning.
What Internal Temperature Should Your Ham Reach?
To guarantee your ham is both safe and delicious, it’s important to cook it to the right internal temperature. For a fully cooked ham, the ideal temperature is 140°F. Use a reliable meat thermometer to keep an eye on this as you cook.
Spiral hams should reach 140°F before serving, especially if reheated. Non-spiral or shank hams also need to hit 140°F, cooked at 15-20 minutes per pound.
Reheating doesn’t require raising the temperature beyond 140°F; just warm it through. After it reaches 140°F, let the ham rest for about 10 minutes.
Resting allows the juices to redistribute, making it safer and juicier to eat.
How to Achieve a Caramelized Glaze and Crispy Crust
Achieving a caramelized glaze and crispy crust on your ham requires a strategic finish to the cooking process. As the ham nears completion, increase your oven temperature to 425°F during the last 15-20 minutes.
For a perfect caramelized glaze and crispy crust, raise oven temperature to 425°F in the final 15-20 minutes.
Apply a thick layer of glaze once the internal temperature hits 120°F, then continue roasting until it reaches 140°F. Turn the roaster to high heat and uncover it to help caramelize the glaze and develop a crispy crust.
Baste the ham with additional glaze during these final minutes to boost caramelization and improve flavor depth. Keep a close eye on the process to prevent burning, and use a timer to control the timing precisely.
This method guarantees a beautiful, flavorful crust with a shiny, caramelized finish.
Serving Ideas: Sides and Presentation Tips
When serving a glazed ham, pairing it with colorful sides and thoughtful presentation instantly elevates your meal. To make it truly memorable, consider these serving ideas:
Arrange sliced ham into spiral cuts to showcase its decorative appearance and make serving easier. Garnish the platter with fresh herbs, sliced oranges, grapes, or lettuce for vibrant color and flavor contrast.
Surround the ham with creamy sides like cheesy orzo, mac and cheese, or sweet potato casserole for a balanced and inviting plate. Drizzle leftover glaze or juices over the sliced ham to add shine and moisture, boosting both its visual appeal and flavor.
These presentation tips and sides will lift your holiday table, making every bite as beautiful as it is delicious.
Storing and Reheating Leftover Ham for Maximum Freshness
Storing leftover ham properly guarantees it stays fresh and safe to eat for as long as possible.
To store leftover ham, put it in airtight containers or tightly wrapped heavy-duty freezer bags. This helps prevent freezer burn and keeps the flavor intact.
Be sure to label and date the packages. Store them in the refrigerator if you’ll eat them within a few days, or in the freezer for up to six months.
When reheating, make sure the ham reaches an internal temperature of 140°F. This ensures it’s safe to eat and tastes great.
For the best results, let the ham rest at room temperature for about 10 minutes before slicing and reheating.
Proper storage and reheating techniques help maximize the freshness, flavor, and safety of your leftover ham.
Troubleshooting Common Roaster Oven Ham Challenges
Even with proper storage and reheating methods, using a roaster oven to cook ham can present some challenges. Common issues include uneven cooking and dryness. To troubleshoot:
- Make sure your roaster is properly preheated to 275°F before adding the ham for consistent heat distribution.
- Always verify the internal temperature reaches 140°F with a reliable thermometer to ensure safety.
- For moisture, cover the bottom of the ham tightly with foil or use the roaster lid to retain humidity.
- Adjust cooking times based on ham size and shape; larger or bone-in hams may need longer, and scoring can help with glaze adhesion.
Creative Ways to Use Leftover Ham in New Recipes
Leftover ham is a versatile ingredient that can be turned into all kinds of tasty new dishes. You might layer diced ham with mashed potatoes and cheese, then bake it until golden for a creamy ham and potato casserole.
For a quick, hearty meal, simmer chopped leftover ham with dried beans, vegetables, and broth to make flavorful ham and bean soup. You can also toss diced ham into omelets or breakfast burritos for extra flavor and protein.
Another great idea is to make a ham salad by mixing chopped ham with mayonnaise, relish, and herbs—perfect for sandwiches or lettuce wraps. To boost flavor and shine, brush your ham with a glaze before serving or adding it to recipes.
And don’t forget, you can freeze leftover ham in portions for future use in pizzas, salads, or chowders. That way, you’ll always have some handy for quick and tasty meals.
Frequently Asked Questions
How to Cook a Ham in the Roaster Pan?
To cook a ham in a roaster pan, start by preheating your oven to 275°F. Wrap the ham tightly in foil to keep it moist.
Place the ham on a rack inside the pan and add a bit of water or juice for extra moisture. Cover the pan with a lid or loosely tent it with foil.
Cook the ham for about 12-15 minutes per pound until it reaches 140°F. Once done, you can glaze or caramelize it for a flavorful finish.
Is Spiral Ham Good for a Diabetic?
Spiral ham can be okay for a diabetic if you choose wisely. Look for low-sodium, unglazed options, and go for sugar-free glazes to help keep your blood sugar steady.
Watch your portion sizes, since even small amounts contain carbs and sodium. It’s a good idea to check with your healthcare provider or dietitian to see how it fits into your meal plan.
That way, you can enjoy it safely without spiking your blood sugar.
Can You Cook a Ham in a Roaster With a Lid?
Yes, you can cook a ham in a roaster with a lid. Using the lid traps moisture and heat, which keeps the ham juicy and tender.
Keep the lid on during most of the cooking process to prevent it from drying out. Then, remove it when you want to glaze or caramelize the ham for a nice finish.
Make sure the lid fits tightly so everything cooks evenly. And don’t forget to check the internal temperature to ensure it’s heated through properly.
Do You Put Water in a Roaster When Cooking a Ham?
Yes, you should put water in the roaster when cooking a ham. Adding 2 to 4 cups of water creates steam, which keeps the ham moist and tender throughout the cooking process.
Make sure the water is at least a quarter-inch deep to produce enough steam. Check your roaster’s manual for specific guidelines, especially if you’re cooking a larger or leaner ham.
This helps prevent the ham from drying out and keeps it juicy and flavorful.
Conclusion
Now, imagine slicing into that golden, glistening ham, its aroma filling your kitchen like a warm hug. Each juicy, tender bite melts in your mouth, a testament to your careful preparation.
With your roaster oven’s gentle heat, you’ve created a feast that’s both beautiful and delicious. Enjoy the moment, savor every flavor, and appreciate the effort you put into cooking ham in a roaster pan.
Let this memorable meal be the highlight of your gathering, all made possible by your skillful use of the roaster pan.